

Artist's Guide: Steps to Create an Account and Set Up Your Art Store from Start to Finish
4-minute read
- 📑 Phase 1: Registering a Seller (Artist) Account
- 🎨 Phase 2: Art Store Setup
- 💳 Step 3: Payment and Withdrawal Settings (Payment Setup)
- 📞 Phase 4: Customer Support Setup
- 🔍 Phase 5: Search Engine Optimization and Social Media Setup (SEO & Social Setup)
- 🌐 Step 6: Link Social Media Accounts and Complete the Process (Social Profiles & Completion)
Welcome to the Funoon platform as a partner and artist! This guide takes you step by step from the moment you log in to the site until you’ve set up your personal store so you can start displaying and selling your artwork. Please follow the steps below in order during the quick registration process:
📑 Phase 1: Registering a Seller (Artist) Account #
- 👤 Step 1: Go to the website From the top menu of the website, click on “My Account” or “Log In”
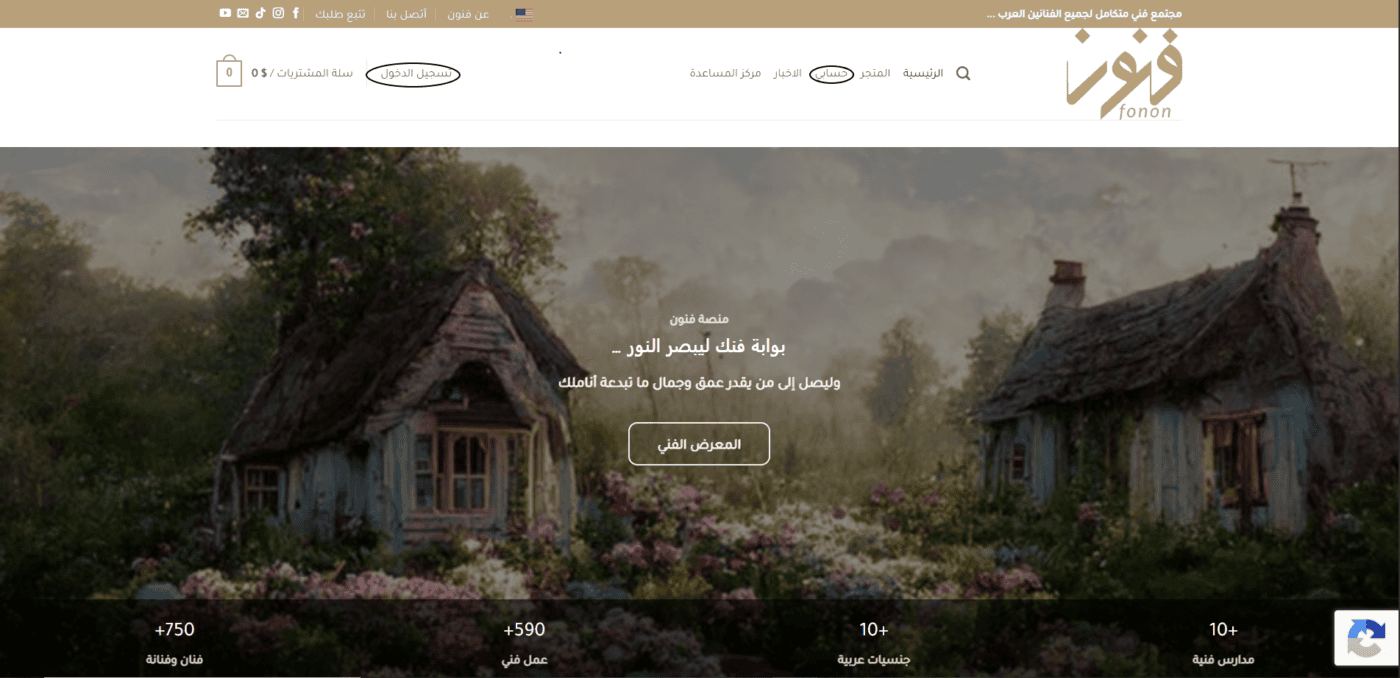
🔗 Step 2: Switch to the Artist template At the bottom of the list, click the link “Register as a Seller” To go to the Artists Form.
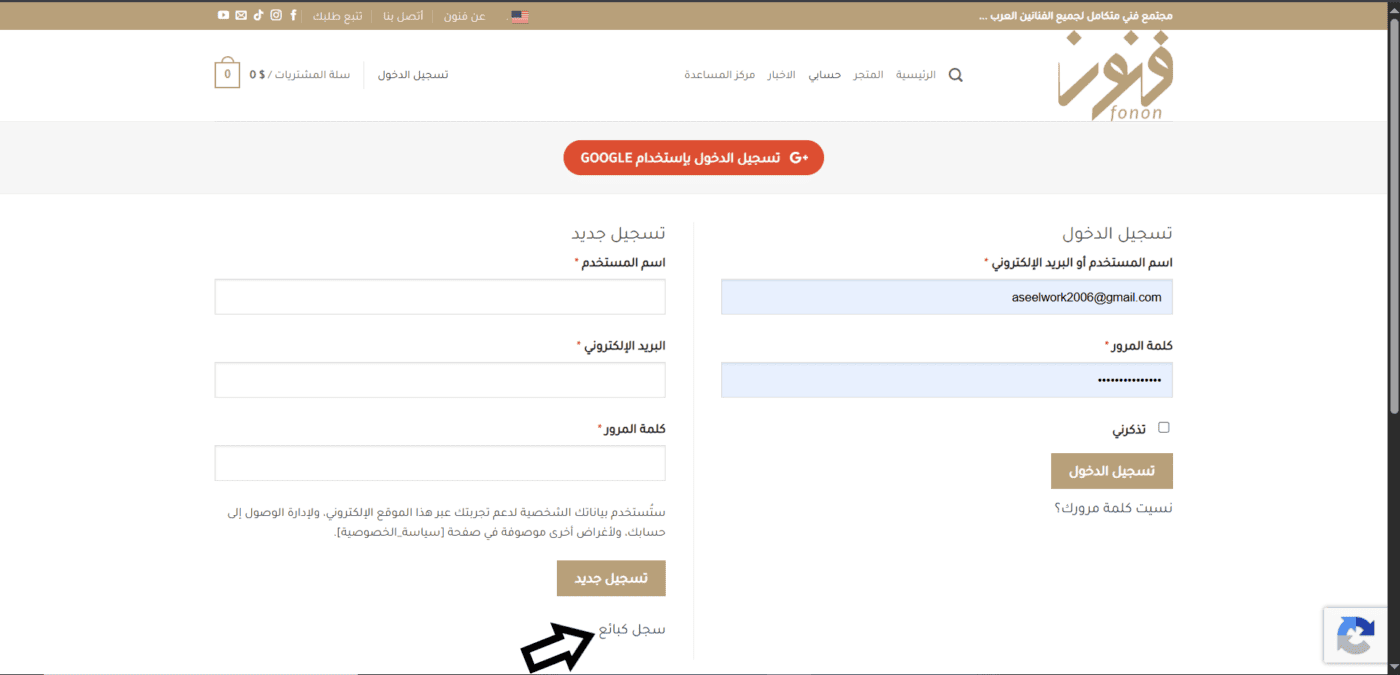
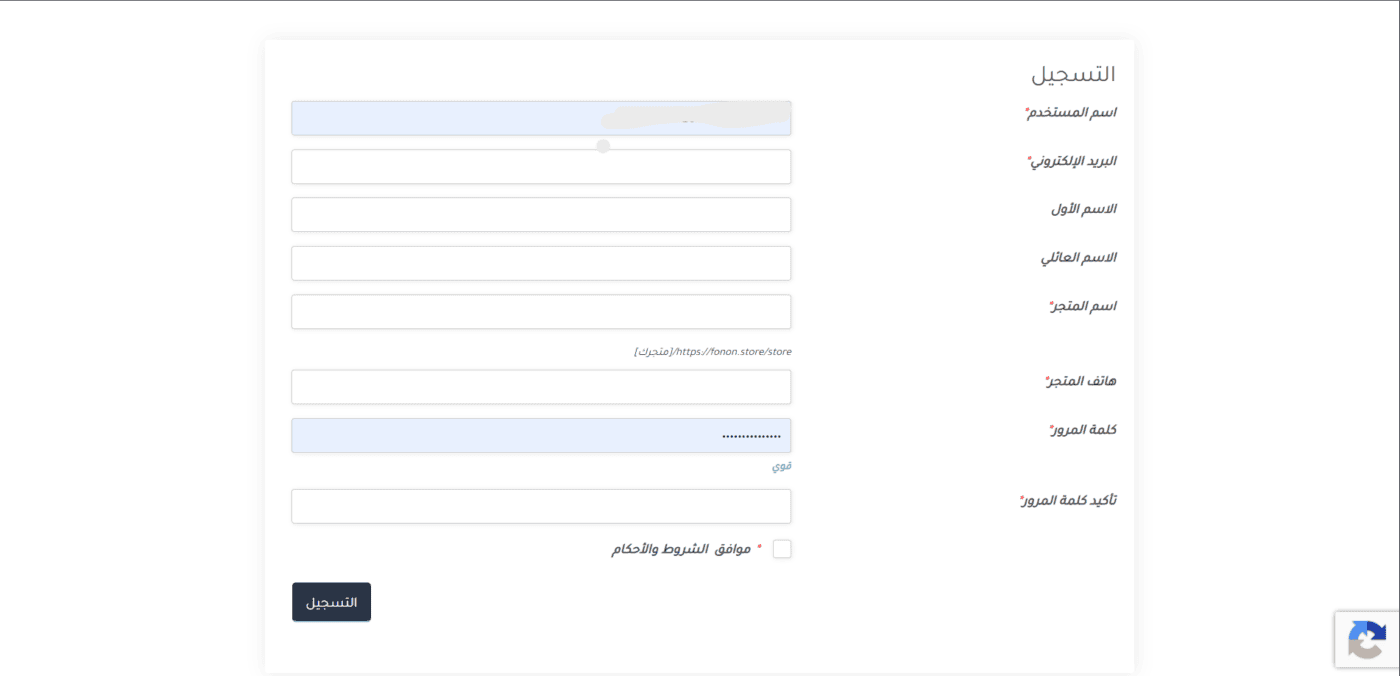
📝 Step 3: Fill in the Basic Information Please fill out the following fields accurately:
- Email and username: To manage your account and receive notifications.
- First Name and Last Name: To register your real name with the administration.
- Store Name and Phone Number: To provide the link to your art exhibition and your contact number.
- Password: Choose a strong password (the word “Strong” (in green).
- Agree to the terms, then click “Registration”.
💡 Technical Crossing Alert: “The platform virtually assigns visitors collector accounts; your commitment to choosing (I'm a salesman) Entering your unique studio name is the only key that unlocks the administrative control panel; without it, your paintings will not appear in the gallery.
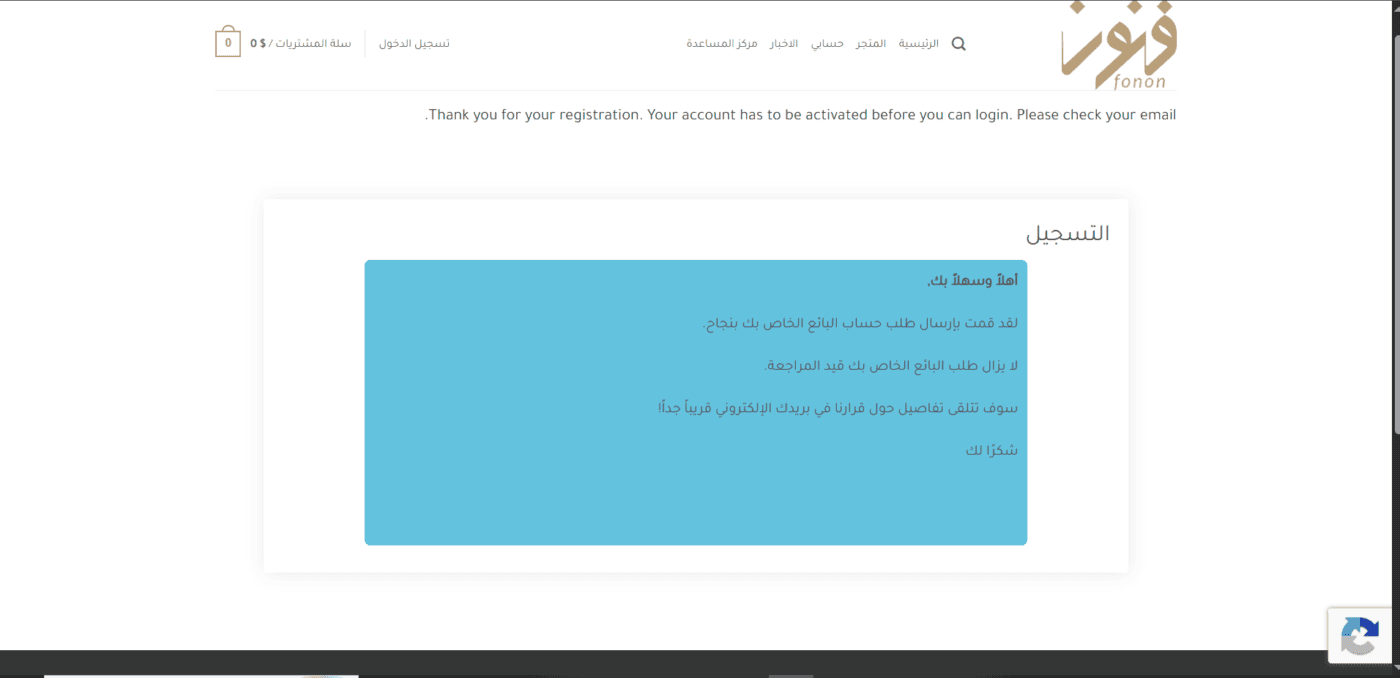
⏳ Step 4: Review the request You will see a message stating that your account is currently being reviewed and verified by the platform's administration.
⚠️ Very Important Notice: 💡 You must check your email immediately to confirm your account; you will not be able to manage or control your store at all without this confirmation. Please allow 8 to 24 hours for the store to be fully activated by the administration.
🎨 Phase 2: Art Store Setup #
Note: This page appears immediately after your account is confirmed via email and approved by the administration.
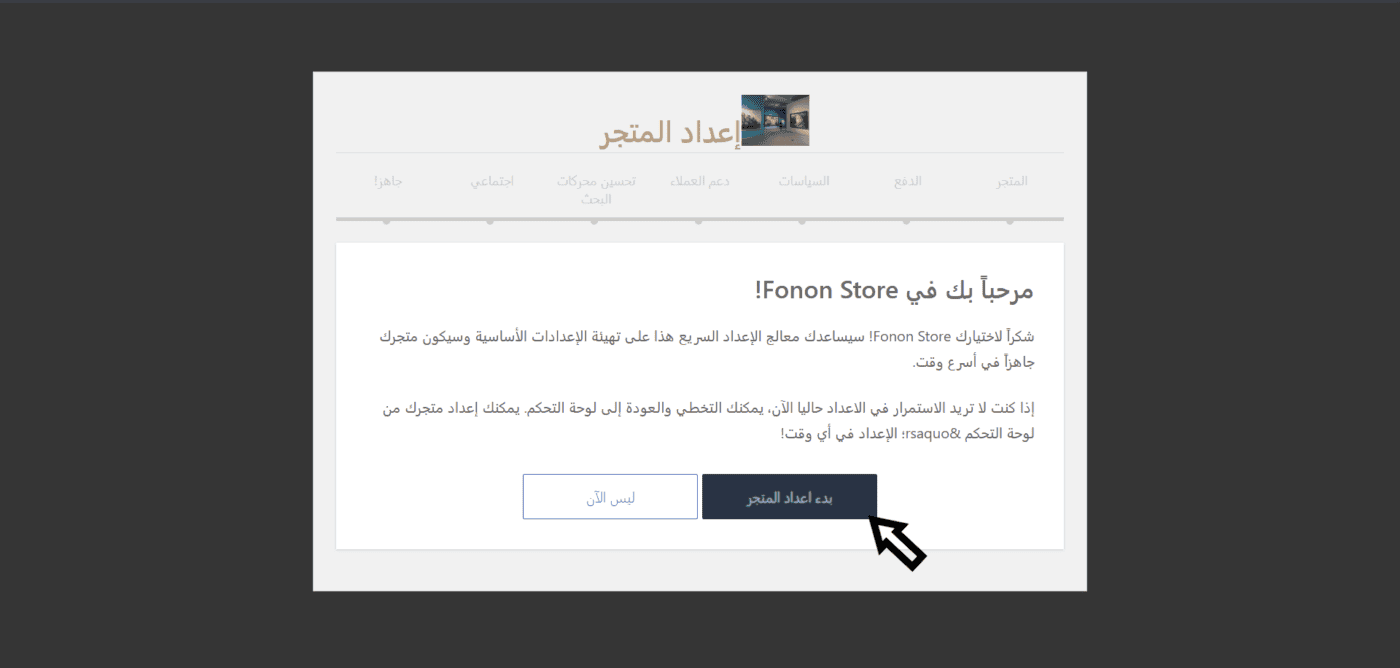
- 🚀 Step 1: Start Smart Setup When you activate your account, a welcome screen will appear to help you set up your art store. Click the button “Start Setting Up the Store” Indicated by the black arrow.
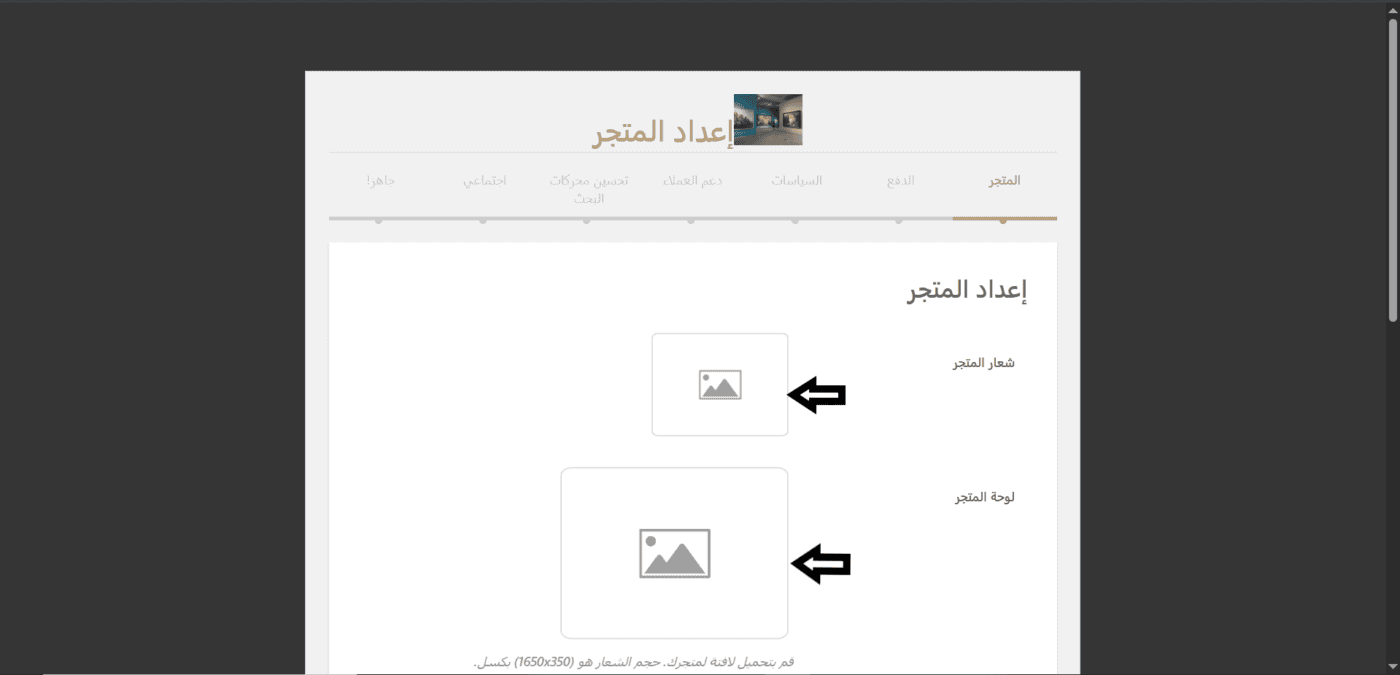
🖼️ Step 2: The Exhibition's Visual Identity
Upload images for your storefront according to the sample images:
- Store Logo: Click the small box to upload your profile picture or your gallery's logo.
- Store Sign (Banner): Click on the large box to upload your store banner (preferably 1650 × 350 pixels) or one that works for you:
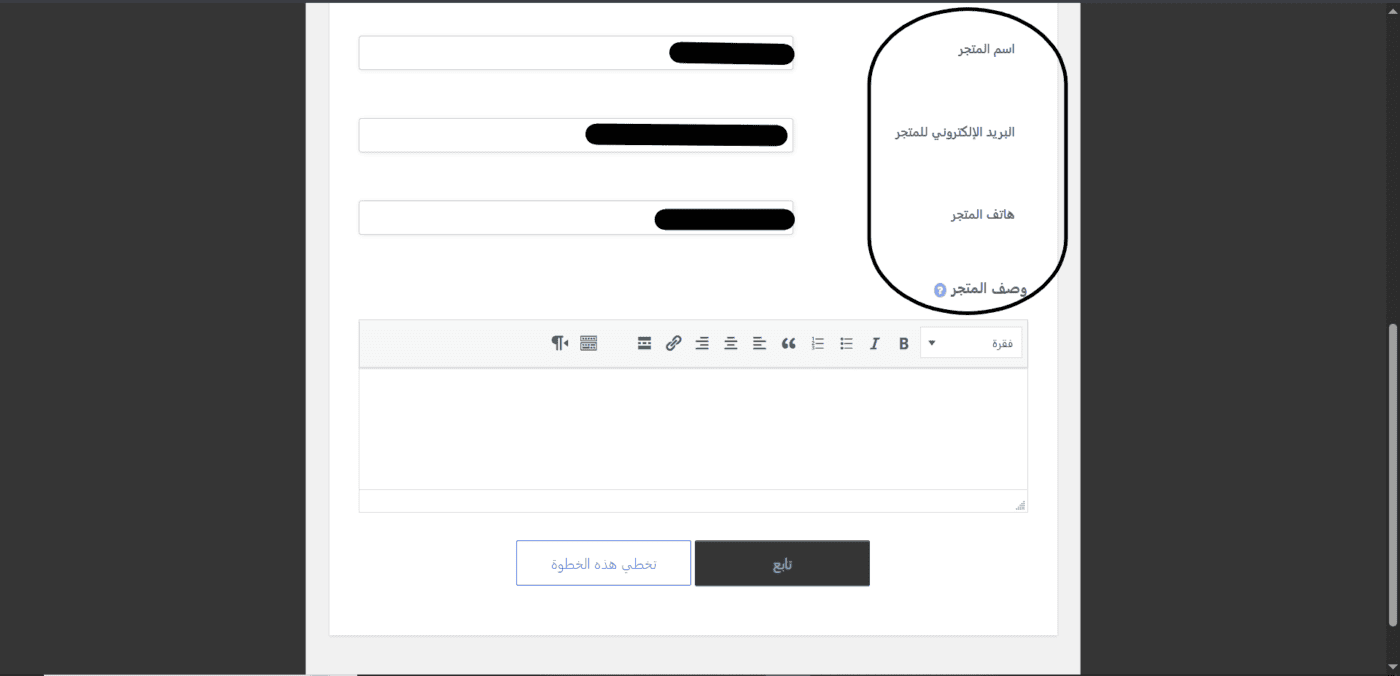
📞 Step 3: General Store Information Verify that the data highlighted within the black circle is correct:
- Store Name: The name that will appear to the public.
- Mobile email: Essential communication channels for your art store.
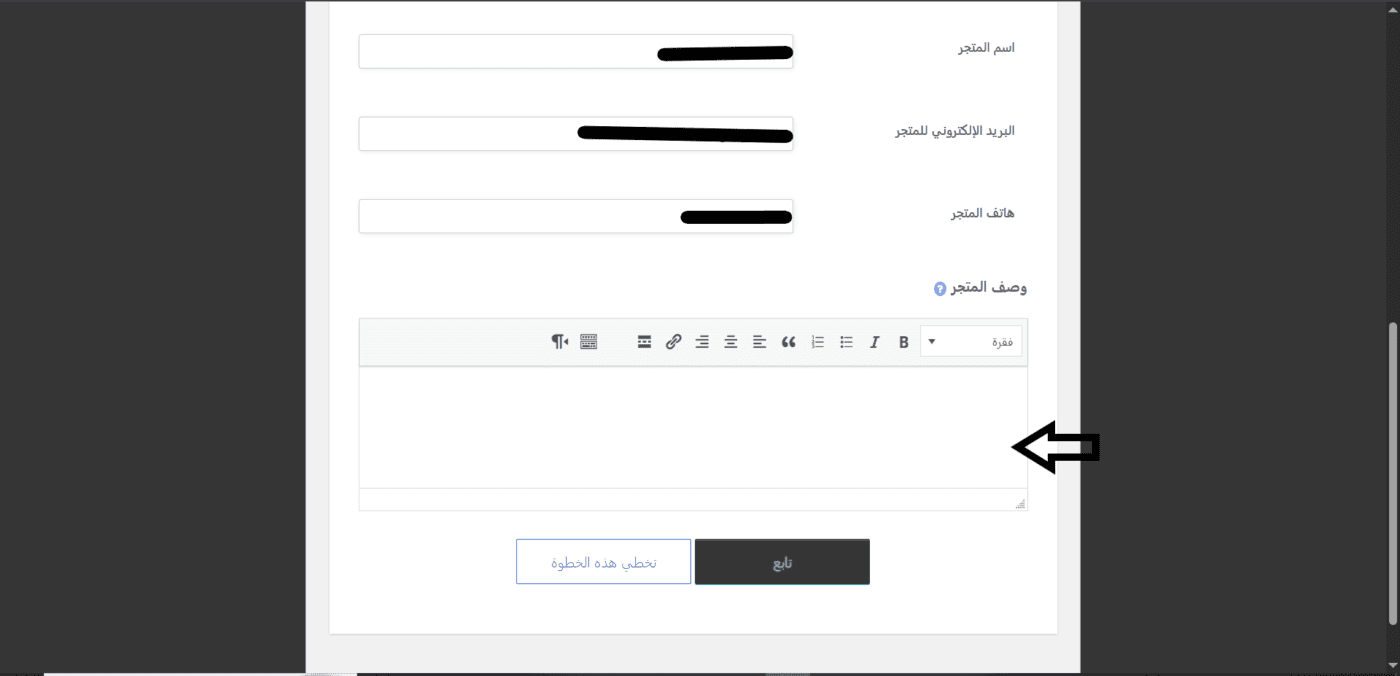
✍️ Step 4: Write a description of the store Write a brief description of your artistic identity and painting style in the text box indicated by the black arrow, then click the button “Continue” To proceed to the next step.
💳 Step 3: Payment and Withdrawal Settings (Payment Setup) #
⚠️ Mandatory Financial Requirement (Platform's International Policy): “Because your art crosses borders, domestic and international bank transfers are subject to international banking policies and regulations; You must write your full name in English only, exactly as it appears on your official documents (passport or ID)..
Why is your commitment to this step so crucial for your store?
- Avoiding Rejection of International Money Transfers: Global banking systems and networks (such as SWIFT) do not accept names written in Arabic; any discrepancy—even a single letter or character—will immediately result in the transfer being frozen or returned by intermediary banks.
- Account Holder Information Match: International law prohibits the transfer of profits to accounts held in the names of third parties to avoid financial audit issues; therefore, the name you enter in English must match the bank account holder’s name exactly.
- Automating Instant Profits: Preparing this information in advance allows the website’s software to record the profits and automatically and immediately deduct the platform’s commission from your commission as soon as the buyer clicks “Confirm Order.”.
- Building credibility with buyers: Using professional and secure payment channels for your store eliminates buyers’ hesitation and encourages them to purchase your paintings without worry, thereby increasing your sales.
- Avoiding Disputes and Accounting Reconciliation: Accurately entering your financial data ensures that your studio maintains accurate, error-free accounting records, which protects you from any discrepancies in your accounts or delays in the settlement of your recurring receivables.
🔽 Step 1: Select a payment method From the column “Preferred Payment Method”, Click the black drop-down arrow shown to select your preferred method of receiving your earnings (e.g., bank transfer or bank).
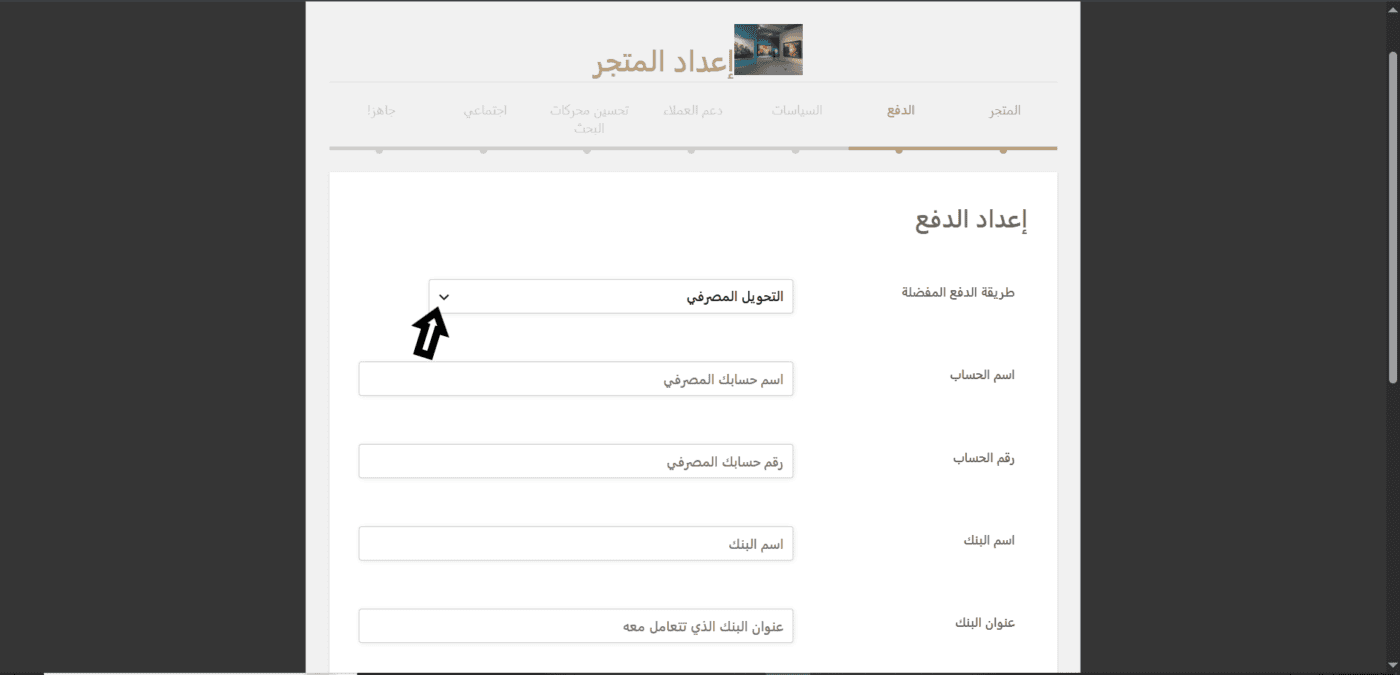
🏦 Step 2: Enter your bank information (domestic and international) Please fill out your bank account information accurately to ensure you receive your earnings:
- Account Name and Number: Your full name and your local account number as registered with the bank.
- Bank Name and Address: The actual name of the bank and the branch or city where it is located.
- International Symbols (Scroll down): Enter the routing number, IBAN, SWIFT code, and IFSC code, if available.

📞 Phase 4: Customer Support Setup #
📞 Bridge of Communication: “Buying art is an emotional experience based on trust; providing a valid email address and phone number (preferably linked to WhatsApp) gives international buyers the ability to contact you and ask about the story behind your painting, which speeds up the process of closing the sale.
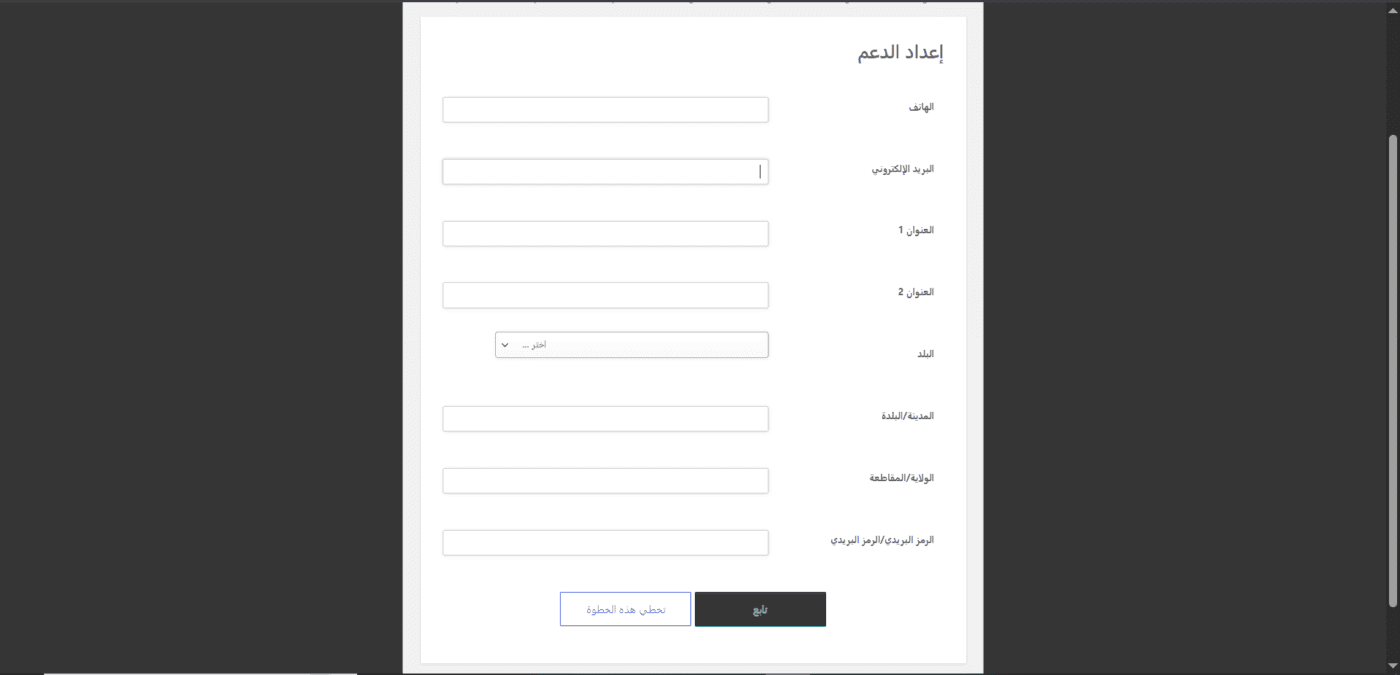
- 🛠️ Standardized Step: Entering Contact Information and Address Enter the information needed to handle buyer inquiries and resolve their issues:
- Phone and Email: Direct contact methods customers can use to reach you.
- Title (1 and 2): Details of the address of your workplace or art studio.
- Country and City: Select your country of residence and city or town from the list.
- State and ZIP Code: Enter the name of your county and the postal code for your area to ensure accurate shipping and documentation.
🔍 Phase 5: Search Engine Optimization and Social Media Setup (SEO & Social Setup) #
🔍 Your Profile on Search Engines: “The ‘Funoon’ platform is home to a huge community of creators; your commitment to filling out the SEO fields and writing an accurate description of your art studio is your free ticket to the top of Google’s search results. And make sure your linked social media accounts (such as your Instagram content) are set to public so that collectors can discover the story behind your paintings.”.
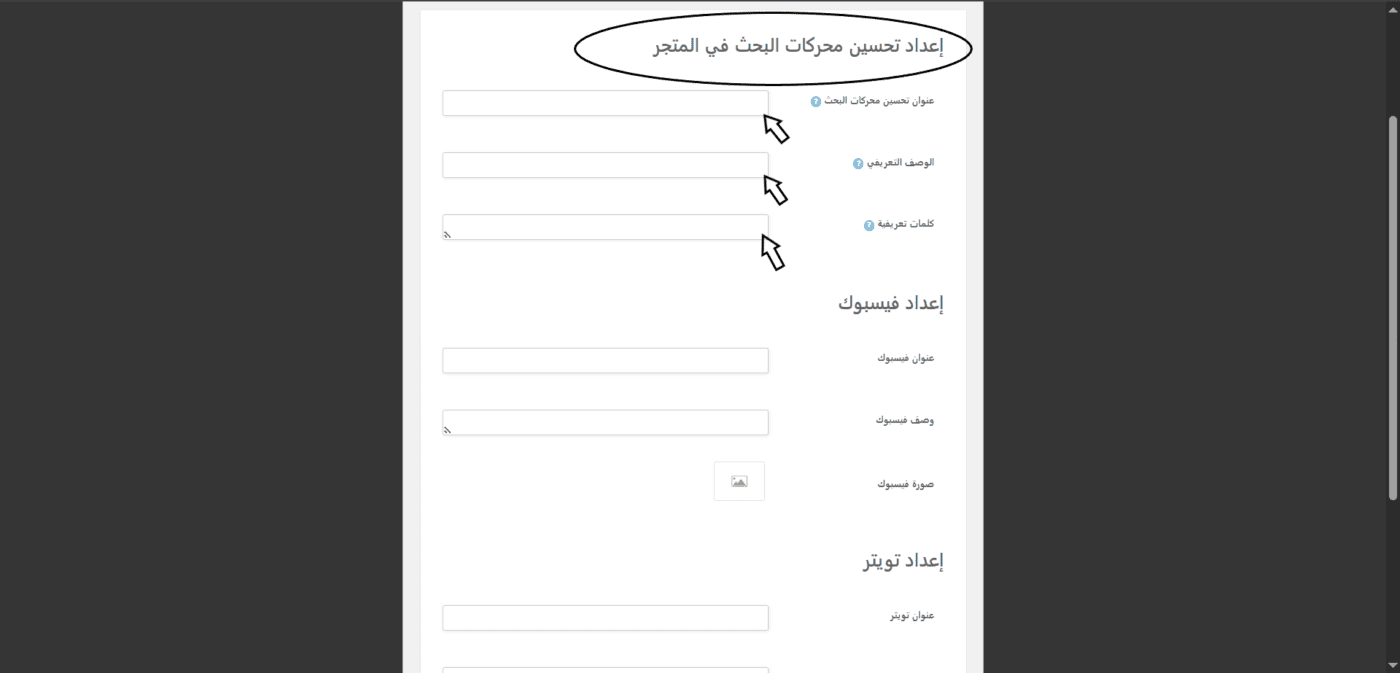
- 🌐 Step 1: Set Up Search Engine Optimization (SEO) for Your Store In the fields marked with arrows (below the circle “Setting Up Search Engine Optimization for Your Store”), enter the following information to help your store appear on Google:
- Search Engine Optimization Title: The marketing name of your art store.
- Description and Keywords: A brief description and keywords that accurately describe your work and paintings.
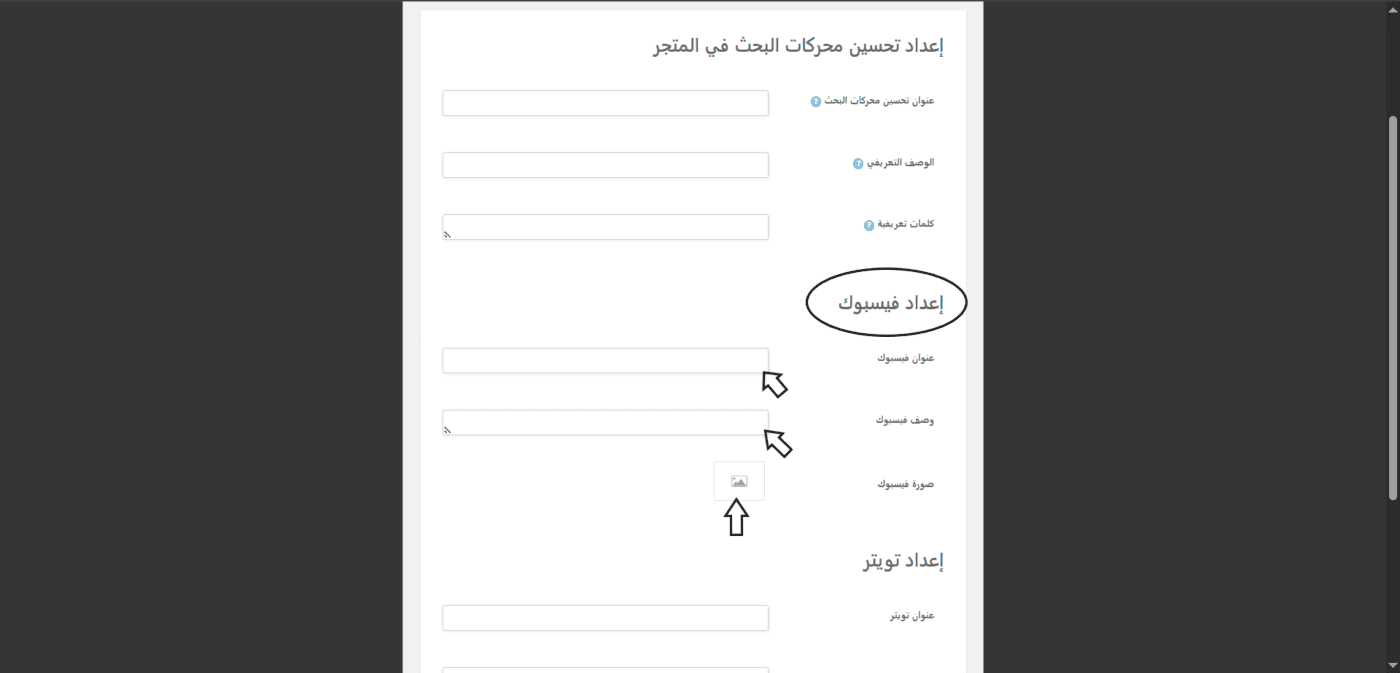
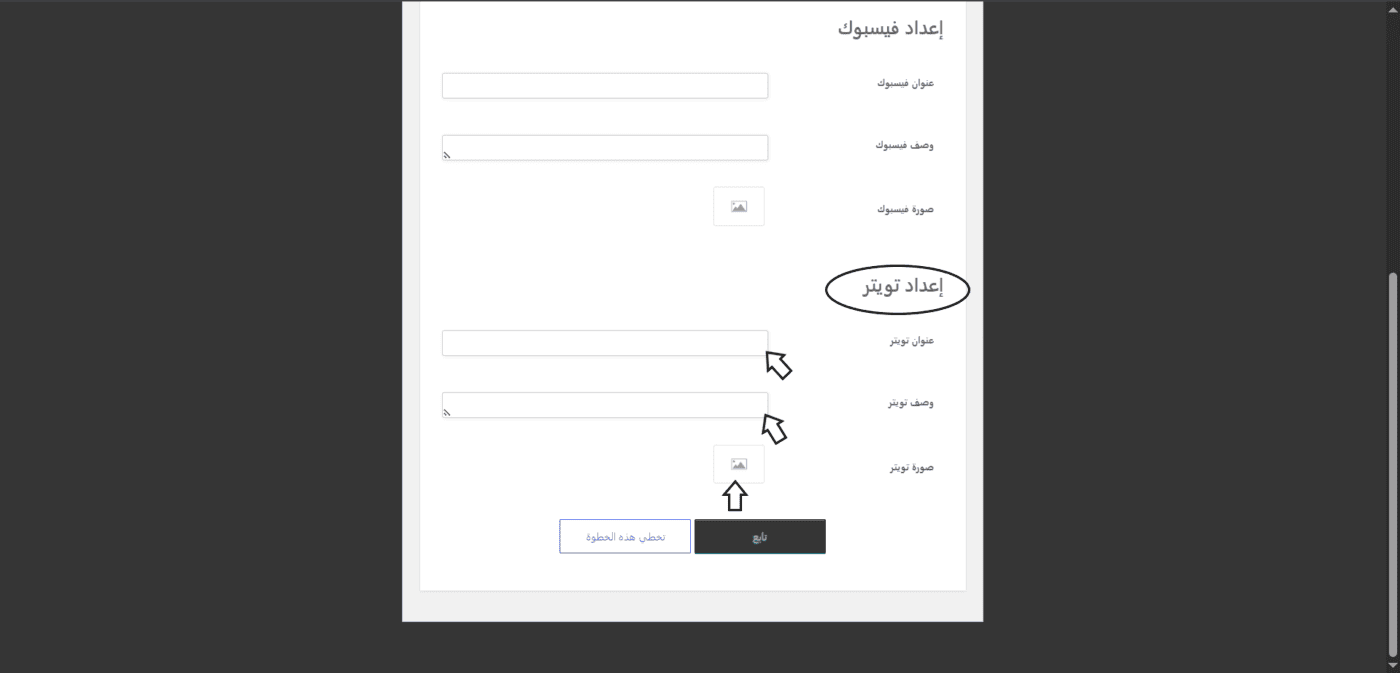
👥 Step 2: Facebook Setup In the fields marked with arrows (below the circle “Facebook Setup”), Enter the platform appearance data:
- Facebook Title and Description: The title and promotional text that appear when you share your store's link on Facebook.
- Facebook Description: Write an engaging and concise marketing blurb here describing your style and art. This text will appear to the public below your shop’s name when you share the gallery link on Facebook to attract buyers.
- Facebook photo: Click the small box (indicated by the vertical arrow) to upload a custom image to use as the link's cover.
🐦 Step 3: Twitter Setup / X Setup Scroll down to the fields marked with arrows (below the circle “Twitter Setup”):
- Twitter Title and Description: Select the text and description for the link post on the X platform.
- Twitter photo: Click on the image box indicated by the vertical arrow to upload your Twitter cover photo, then click the button “Continue” To save all settings and proceed to the final step.
🌐 Step 6: Link Social Media Accounts and Complete the Process (Social Profiles & Completion) #
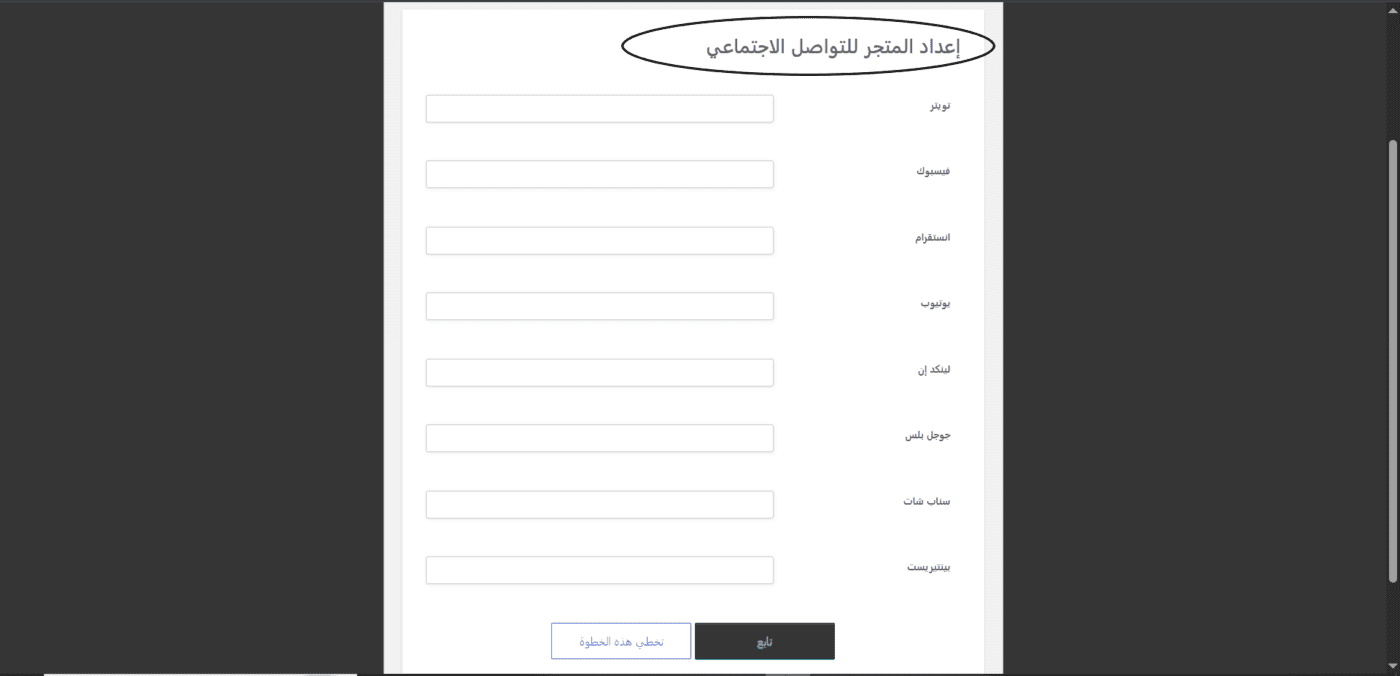
- 🔗 Step 1: Connect your social media platforms On the page “Setting Up Your Store for Social Media”, Enter the links to your official accounts (such as Twitter, Facebook, Instagram, YouTube, and LinkedIn) in the designated fields so that customers can easily navigate between your gallery and your art pages, then click the “Continue” (or “Skip this step” (to be added later).
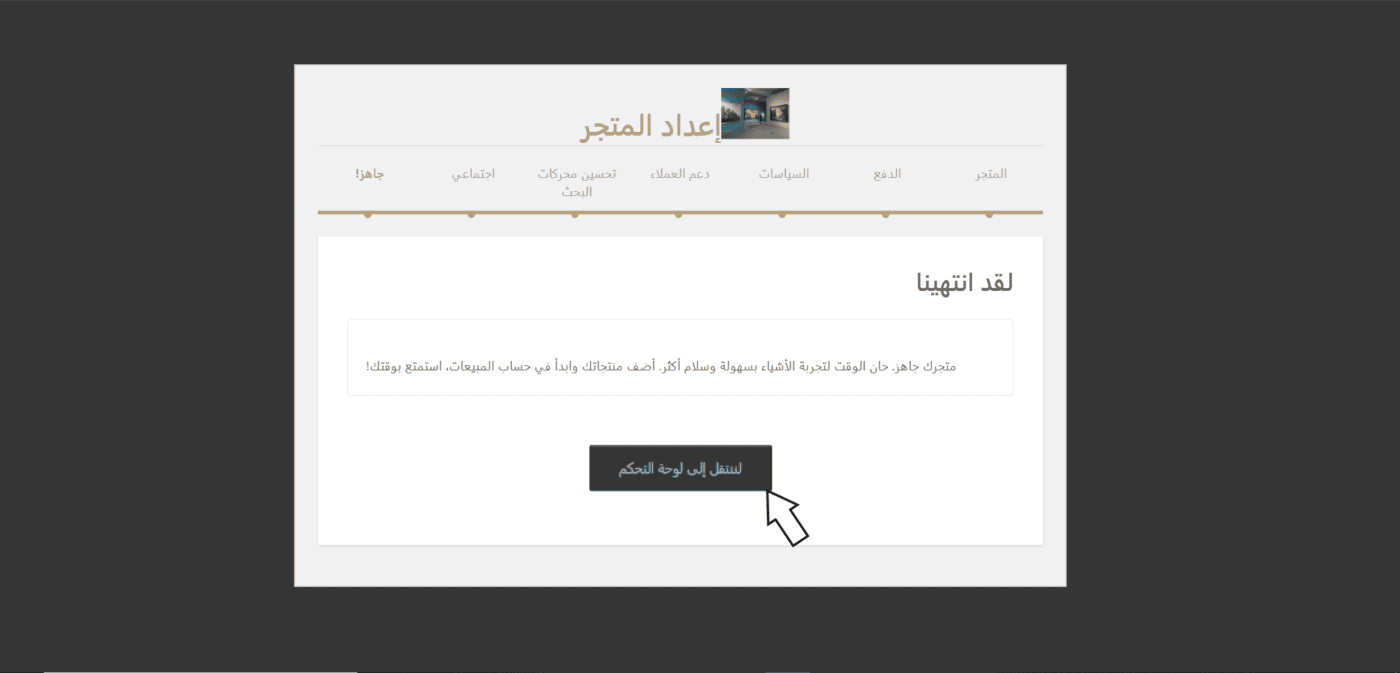
🎉 Step 2: Finish and Go to the Control Panel A screen will appear “We’re done.” To confirm that your art store is now fully ready to accept your artwork, click the button “Let’s go to the control panel” Click the black arrow to start adding your listings and tracking your sales.


Powered by BetterDocs